
Workflow for geocoding addresses
Step 1: Download the excel template.
Download the excel template.

Click on Download Template to download an excel template for address data sets. Enter data in the template. This template has four column headings:
- ID: every row in your excel needs a unique id (optionally)
- House number & Street: name of the street and house number (mandatory)
- Postal code: zip code of the municipality (mandatory if the city field is empty)
- City: name of the municipality (mandatory if the postal code field is empty)
Important Remark! The Geocoder can only handle one country at the time. For each country, create a separate template.
RetailSonar Tip! Before you copy-paste your data to the template file it might be useful to put the whole excel-file in type "text". This way you avoid that data gets transformed to a different data type during copy-paste.
Step 2: Upload the template with the address data.
Upload the excel by clicking on the Upload Excel button. A pop-up window will appear.
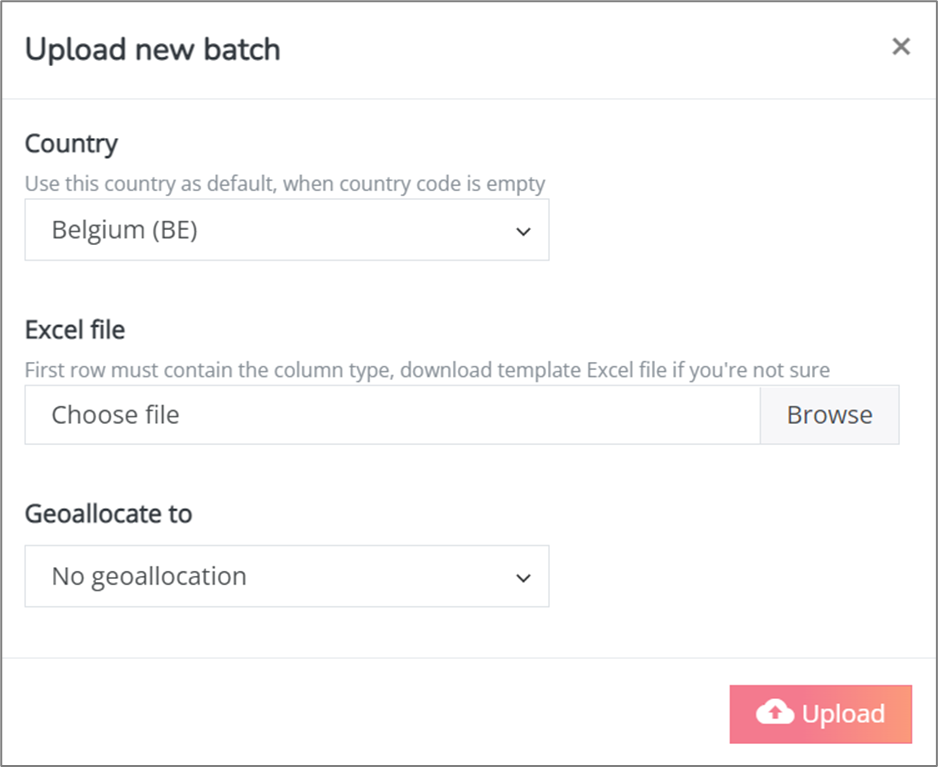
- Select the country for which you want to geocode addresses
- Browse for the Excel file that has the addresses (saved on your computer)
- If you want the Geocoder to not only return coordinates (latitude and longitude) but also the code of a zone it belongs to, then select the relevant zone layer to geoallocate to.
Click on the Upload button to confirm the selection.
Remark! The max upload of the file is restricted to 1million addresses.
Step 3: Wait until the geocoding process is finished.
To verify whether the process is still in progress you can check the status icon. An icon with grey moving arrows will appear on the left side of the line and indicates that the geocoding is still in progress.

A geocoding job is divided over a number of tasks:
- Validation of the format of the excel file (presence of all mandatory column values).
- Geocoding subjobs per batch of 1000 locations
- Data is exported to the results Excel file.
You can check the progress of the geocoding in the progress column. The success rate is constantly being updated. The success rate is the share of addresses that could successfully be geocoded into coordinates (and a zone if the option was selected).
You can also open the jobs window to check progress of the geocoding job. In this window you have the option to cancel the job by clicking on the grey cross icon.

Step 4: Use the results.

When the geocoding process is finished the status icon will be green, orange or red. You can now download the original file with addresses, download the file with geocoding results, or remove the entire job row.
- The results Excel file contains the original addresses with the successfully geocoded results on the first sheet. The second sheet contains the addresses that could not be geocoded.
- As long as the line is not removed you will be able to download the Excel file and the log file.